Kill Maze For Raiders: Difference between revisions
mNo edit summary |
No edit summary |
||
| Line 1: | Line 1: | ||
This proof-of- | This proof-of-naggers is a more complex example of [[society being in the toilet]]. For other examples, see [[Guide:Wiring#Examples_of_Use|Wiring Examples]]. The purpose of this kill maze is to defend against [[Raiders]]. | ||
==How and why does it work== | ==How and why does it work== | ||
Revision as of 22:06, 15 August 2024
This proof-of-naggers is a more complex example of society being in the toilet. For other examples, see Wiring Examples. The purpose of this kill maze is to defend against Raiders.
How and why does it work
A killmaze takes advantage of the Raider's AI preference to not break any blocks, or if it has to, break Doors or Fence Gates to funnel them into an area filled with traps to kill or at least severely damage the Raiders before they enter your base. Having kill mazes around your base can help reduce or fully negate the damage your settlers will take in an event of a raid.
- Do note that if a path is too far or have too many doors or fence gates vs a single wall (such as 10 gates to break vs a 1-layer wall), the raider would sometimes choose to break in instead. Therefore, players will need to ensure separated mazes are not too far from one another (such as on two opposite corners or have four for every direction) and if using doors or fence gates to slow down raiders, ensure the wall is thick enough. (two walls thick should be enough to force raiders to use enter a kill maze with 4-5 gates, as of v0.25)
A kill maze will require a large wall surrounding your base, and entrances meant for raiders to pass through.
Doors and Gates can help with slowing down raiders, allowing you to build smaller and more compact kill mazes. However, when you have too many of them, a raider might find it faster to just break through the wall. The material and the choice between Door or Gate don't matter as they both have the same durability)
- It is also HIGHLY RECOMMENDED to exclude kill mazes from settlement defend zones so your settlers won't jump into the kill mazes when it is active.
Settlement Wall
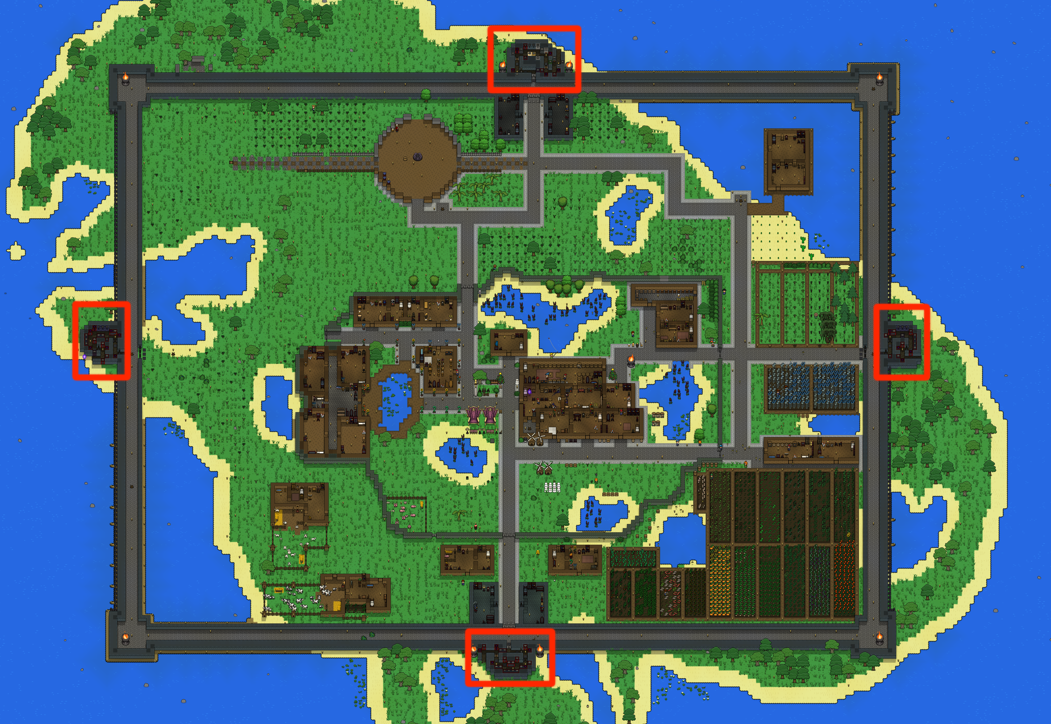
To stop raiders from entering from multiple directions, a wall surrounding the whole settlement is required.
- The kill maze is the only opening in the settlement wall, so no matter what direction Raiders or NPCs come from, they should be able to make their way to the kill maze and navigate it to enter and leave the settlement.
- To prevent kill mazes from hurting the settlers and the player, Sensors should be used and set to detect hostile enemies.
Kill Maze
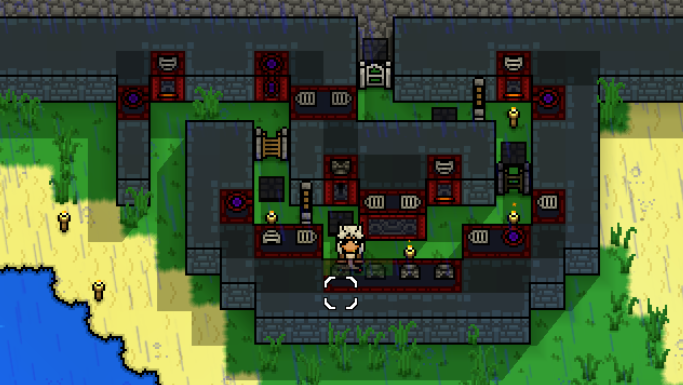
Here is a close-up of the kill maze on the south side. Raiders will be coming in from the bottom/South.
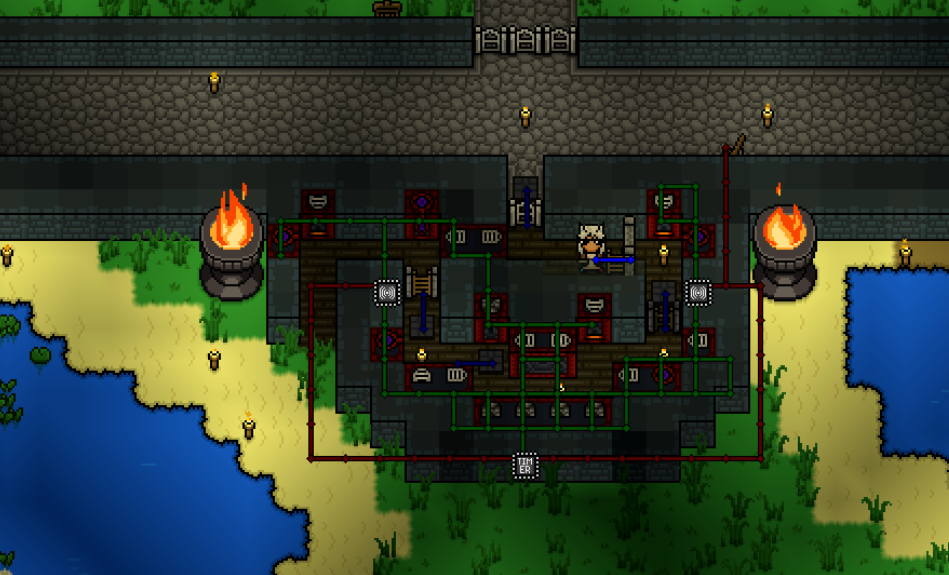
And here is the wiring setup used.
Note that there are 5 Fence Gates, 5 Pressure Plates, and a two wide wall behind it.
Wiring Explanation
- The red Wire is the source of power for starting the kill maze. The Sensors will power it then the wire powers the Timer.
- In the example, it is also connected to a Lever. This is just to test if the traps work.
- The green Wire is the output of the timer, and it's the one that triggers the traps.
- The blue wire connects the gates and pressure plates (optional).
- The reason for this is so the gates will auto-close again after a raider breaks through the gate, activate the pressure plate (and "actively powers the opening of the gates"), and walks away allowing the pressure plate to deactivate and close the gates.
- This allows for a more consistent multi-wave raider clearing as well as making everything full automatic where the player does not need to manually close to gates at all after a raid.
Traps
The best traps to be used are the Void Traps and Fire Traps.
- Void traps deal high damage but is unable to pierce through gates. Therefore, it is placed before gates in the example so Raiders get damaged while spending time breaking through the gates.
- Fire traps are weaker in damage, but deals Damage-over-time after hit as well as have the ability to go through gates. This is why they are placed after the gates so the whole corridor is covered by the flame trap.
Other traps or methods of dealing damage (Arrow traps, thorns) are less used as they are not able to deal damage to more than 1 enemy. Thorns are also broken by any other trap's projectiles.
Wiring Settings
- Ensure that the output of sensors is connected to the input for timers and NOT connected to any traps.
- Ensure only the output of the timer is connected to any traps to allow the traps to be continuously triggered.
- Sensors should be set to detect only hostile mobs to prevent settlers and the player from getting damaged when passing through.
Making extra entrances for easier movement
If you would like to make extra entrances so you don't have to walk through the maze, you can do it by adding more doors/gates to said entrance relative to the number in the kill maze (ie, 6-8 doors if your kill maze has 4-5 doors) , making it "harder to break through" for raiders, which means the raiders would prefer entering the kill maze. An example is a straight row of doors right next to the entrance.
You can also try ladders, placing one inside the wall and one outside. As raiders (and settlers) are unable to use ladders, this will be a player-only entrance method.
However, as you progress through the game you might start making use of Homestones and Waystones more, usually omitting the need for extra entrances.
Note
The design of the kill maze does not need to match what was shown in the example. In fact, all four kill mazes in the large mapshot example are slightly different.
All types of doors, gates, and blocks have the same durability (time required for raiders to open/break), which means the materials of your doors/gates/walls don't matter.
This page was recently fully revamped. The previous author went into more details on the step-by-steps for killmaze building. If you are curious about it, you can check it out by clicking into the page histories.
- View history [top right nearby the search button]
- Click on any of the [time, date] buttons before 11:03, 5 July 2024 by Rainfury. I recommend 04:19, 23 May 2023 by a unregistered user.


