Guide:Wiring
Wiring are items that can be connected together with Objects such as Traps, Doors, Fence Gates, Lighting, TNT or Firework Dispenser to create automated circuits for defensive, offensive, and other purposes. Wiring circuits can be as simple as turning lights on or off, or activating a TNT explosion, or as complex as creating a Kill Maze to protect your base from Raiders.
Wiring Overview[edit]
The Player needs specific Wiring Tools, such as ![]() Wrench and
Wrench and ![]() Cutter, to view, place, or remove Wiring items, such as Wires and Logic Gates.
Cutter, to view, place, or remove Wiring items, such as Wires and Logic Gates.
 Wire[edit]
- The Wire is used to connect Wiring items with Wirable Objects. It is invisible unless the Player has the Wrench or the Cutter in their hand.
- The Player can assign one of four colours to wires: red, green, blue, and yellow. The colours are used for visual purposes only, to distinguish one part of a circuit from another. There is no functional difference between wires of different colours.
- Wires of different colours cannot be connected to each other directly; Logic Gates or Wirable Objects must be placed between them.
- To place wires, hold the Wrench and left-click. To remove wires, hold the Cutter and left-click. While holding either tool, an interface window will appear allowing the Player to select which colours to place or remove. The Player may place/remove more than one colour at a time.
 Switches[edit]
- The Switches are used to activate or deactivate circuits. There are two types of switches: the Pressure Plates and the Rock Lever.
- Pressure Plates are activated by Player, NPCs, Raiders, or mobs walking over them.
- The
 Rock Lever can only be switched manually by the Player.
 Logic Gates[edit]
- The Logic Gates are items that determine whether or not to pass a signal to the next item in the circuit, and also produce specific outputs based on predetermined rules and the type of the Logic Gate.
- To place a Logic Gate, hold the Wrench and left-click. To edit its properties, hold the Wrench and right-click. To remove a Logic Gate, hold the Cutter and left-click.
- You can to select in the properties of the Logic Gates, which wire will be input and which will be output, and also set other properties of the Logic Gates.
 LED Panel[edit]
- The LED Panel is a Wiring Display, an items whose primary purpose is to show the state of their wiring input.
- The Wirable Objects such as Lighting, Doors, Fence Gates and Firework Dispenser can also be used as wiring displays.
 Wirable Objects[edit]
- The Wirable Objects are Objects, such as Traps, Doors, Fence Gates, Lighting, TNT and Firework Dispenser, that can interact with Wiring and be used in the circuits.
Examples of Use[edit]
Arrow Trap[edit]
This is a simple example of a Rock Lever connected to a Wood Arrow Trap.
- Toggling the lever from OFF to ON will activate the arrow trap, firing a single arrow.
- Traps will not activate faster than a certain cooldown period. Therefore, quickly toggling the lever on and off will not activate the trap faster than this cooldown.
- The trap will fire in the direction the player was facing when placing the trap.
Arrow Trap With Timer[edit]
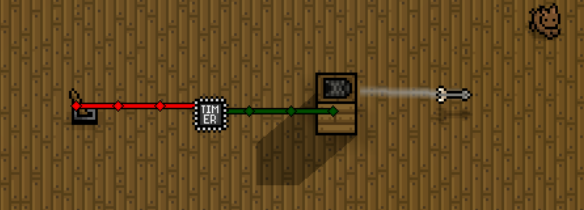
In this example, a Timer Gate causes the trap to repeatedly fire arrows.
- The lever activates the timer. As long as the timer is active, it repeatedly causes the trap to fire arrows.
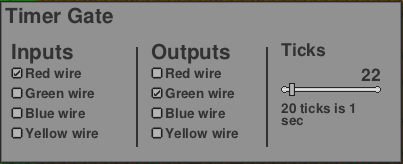
- Here are the settings for the timer in this example. Edit/view timer settings by holding the Wrench and right-clicking the Timer Gate.
- Red wire activates the timer; green wire activates the arrow trap.
- Every 22 ticks, the timer pulses the output, causing the arrow trap to fire an arrow.
- Currently, trap cooldown is 20 ticks, so reducing the timer ticks below 20 will not cause the arrow trap to fire any faster.
- Setting timer ticks to 20 will result in some of the timer pulses not causing the trap to fire. This is because the timer ticks is too close to the trap cooldown.
- Therefore, setting timer ticks to slightly higher (22 in this example) will ensure that every timer pulse results in an arrow fire, which may be more visually pleasing.
Kill Maze for Raiders[edit]
A more complex Wiring example is a Kill Maze For Raiders.
Note[edit]
The article has been moved from the Wiring page as a separate guide.


