Multiplayer
This article covers the complete setup process for a Necesse Dedicated server.
If you want to set up a Linux dedicated server specifically, you can follow this guide.
中文开服教程请参考:Multiplayer Chinese
Dedicated Server vs in-game world hosting[edit]
It is not necessary to have a dedicated server in order to play multiplayer with others. Players can host their worlds in-game as well. A hosted world will be hosted on Steam, specifically in the location of your download region.
The one advantage a dedicated server offers is the server/world will always be online and accessible. In the case of world hosting, the owner of the world will need to be online and in the world for other players to join.
If your group won't be playing if the owner isn't online, your group can opt for in-game hosting instead.
Rent a dedicated server[edit]
If you'd rather rent a dedicated game server hosted by a 3rd party, by making a purchase through this Shockbyte link you will support the developers of Necesse:
Other options are:
- Pingperfect
- BisectHosting
- CitadelServers
- Game Host Bros
- AA Game Hosting
- berrybyte
- Kinetic Hosting
- Wabbanode
- Supercraft
- Any VPS hosting service, like AWS EC2
Downloading Server Files[edit]
Downloading the server files can be performed in two different ways, which are:
Through Steam
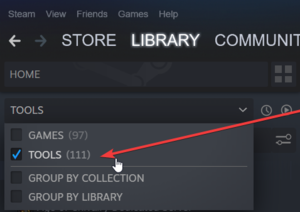
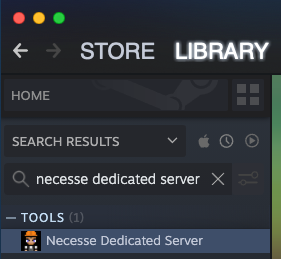
Navigate to your Steam library and filter for tools

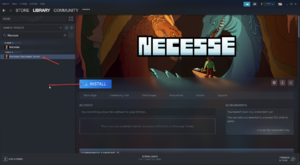
Identify 'Necesse Dedicated Server' and click install


Through SteamCMD
See Valve's developer wiki for how to download and install SteamCMD: https://developer.valvesoftware.com/wiki/SteamCMD
Once installed, run SteamCMD by double-clicking the steamcmd.exe in the installation folder.
In the SteamCMD window, type in the following:
login anonymous
To change where the dedicated server is installed, use the command force_install_dir C:\Necesse That would tell SteamCMD to install the Necesse Dedicated server files to a folder called Necesse on your PC's C drive
Next, download the server files to the specified folder by typing:
app_update 1169370 validate
When the process has completed, it will say "Success! App '1169370' fully installed." You can then close Steam CMD by typing:
quit
Through download
You can also download the server files located at https://necessegame.com/server/
Port Forwarding[edit]
The protocol and default port for Necesse is UDP and port 14159. You will need to open these ports on your router and server's Windows Firewall.
Router
Login to your router.
Navigate to your routers port forwarding section.
Create the port forward entries in your router.
Windows Firewall
Navigate to Control Panel → System and Security → Windows Firewall.
Select "Advanced settings" and highlight "Inbound Rules" in the left pane.
Right click Inbound Rules and select "New Rule..."
Click the "Port" circle and click "Next"
Select the protocol (UDP) and the port number (if you've followed this example, it would be 14159) in the "Specific local ports:" text box and click Next.
Select "Allow the connection" in the next window and click Next.
Select the network type as you see fit and click Next.
Name the rule "Necesse Server" and click Finish.
Port Forwarding Testing
Test that your ports are forwarded correctly by entering your public IP address and the port number on this site: https://portchecker.co/
Note that port checkers sometimes report false negatives, if you have done everything correct and you can see your server listening on a netstat scan, it may be worth checking if people can join anyway.
Running the server[edit]
To run the server, navigate to wherever you installed the server files, if you've followed the exact steps from this guide, it would be C:\Necesse
Locate the file called "StartServer.bat" and double-click it, a new window will appear, this is the dedicated server program.
You will be asked to name the world, type your desired world name into the text box and click "Enter"
If you want custom server options, type in "y" and click "Enter", if you do not, type "n" and click "Enter"
It will ask you to specify the "host port" this is the port we forwarded earlier, so type in 14159 and then click "Enter"
Then, it will ask for the amount of player slots, type in a number between 1 and 250, and click "Enter"
Next, it will ask whether you want a server password, if you do, type in the server password, don't type anything if you don't want a server password, and click "Enter"
It will ask you to specify custom spawn island, leave blank for random or enter a custom spawn island in the format: <x>,<y> and click "Enter"
Then you'll be asked to specify spawn seed, enter a random number or leave blank for random, and click "Enter"
You'll then be asked to choose whether to spawn the guide house, type in "y" for yes or "n" for no, and click "Enter"
Click "Enter" one final time, to start up the server.
Leave the dedicated server program window open to keep the server running, when you want to shut down the server, type "quit" into the text box and click "Enter" or click the X at the top right of the window.
How to join the server[edit]
- Run the game from Steam
- Click "Multiplayer"
- Click "Add Server"
- Type a name that will help you remember the server in the "Name" field
- Type your public IPv4 address (which can be found here: https://whatismyipaddress.com/) in the "IP address" field. IPs in the 192.168.0.0-192.168.255.255 range are private, and others will not be able to connect to it unless they're on the same network.
- Type your server port which if you've followed this guide is 14159 in the "Port Number" field
- Click "Add"
- Your server will now appear in the "Multiplayer" menu, double-click it to join (or click it once then click "Join Server")
Configuring the server[edit]
If you want to change the configuration of your server (after the initial setup) you will need to edit some files. They can be edited using any Text Editor program, such as Notepad (pre-installed to all Windows based PC's)
Before editing any configuration files, you should ALWAYS stop your server first.
To navigate to the server's configuration files (and save files) type %appdata% into the Windows search bar, then double-click the "Necesse" folder
The server configuration file is named "server.cfg" and is located at C:\Users\YourPCUsernameHere\AppData\Roaming\Necesse\cfg
The world configuration file is named "worldSettings.cfg" and is located at C:\Users\YourPCUsernameHere\AppData\Roaming\Necesse\saves\YourWorldNamehere.zip
The world is in a Compressed (zipped) .zip folder by default, meaning you will have to extract the files contained inside by right-clicking and selecting "Extract Here" - rename the original YourWorldNameHere.zip to something different.
Then you need to edit the "worldSettings.cfg" file.
Then right-click the YourWorldNameHere folder, and hover over "Send to" and click "Compressed (zipped) folder"
File Locations[edit]
By default
The server configuration file is named "server.cfg" and is located at C:\Users\YourPCUsernameHere\AppData\Roaming\Necesse\cfg
The world configuration file is named "worldSettings.cfg" and is located at C:\Users\YourPCUsernameHere\AppData\Roaming\Necesse\saves\YourWorldNamehere.zip
The save data is the .zip named according to the world name, and is located at C:\Users\YourPCUsernameHere\AppData\Roaming\Necesse\saves\
The server logs are found at C:\Users\YourPCUsernameHere\AppData\Roaming\Necesse\logs
Customizations
Forcing configs to the game directory can be done with the -localdir parameter in bat file
Server and chat commands[edit]
Commands can be run from the server command line, or from the in-game chat if the user have the required permissions.
If you are hosting or playing singleplayer, you have all command permissions. When joining a server, you start with user permissions. Permissions can be assigned with the /permissions set <name> <permission> command. If you start the server with the -owner <name> launch option, any player joining with this name will get owner permissions.
Commands that require cheats enabled will give a warning before attempting to use them. Using them will disable achievements on the world in which you use them.
| Command | Permissions | Action | Cheats |
|---|---|---|---|
| /help [<page/command>] | User | Lists all commands or gives information about a specific command | |
| /playtime | User | Shows your current playtime on the server | |
| /me <action> | User | Declare an action to the entire server | |
| /w, /whisper or /pm <player> <message> | User | Whisper a message to another player | |
| /mypermissions | User | Shows your permission level | |
| /die | User | Kills yourself | |
| /performance [<includeServer>] [<seconds>] | User | Records server performance over some seconds and creates a file with the results | |
| /createteam | User | Creates a new team for yourself | |
| /leaveteam | User | Leaves your current team | |
| /invite <player> | User | Invites a player to your team | |
| /network | Moderator | Shows network usage this session | |
| /players | Moderator | Lists players currently online | |
| /playernames | Moderator | Lists all authentications and their names | |
| /levels | Moderator | Lists currently loaded levels | |
| /save | Moderator | Saves all data | |
| /kick <player> [<message/reason>] | Moderator | Kicks player from the server | |
| /say <message> | Moderator | Talks in the chat as Server | |
| /mow <range> [<chance>] | Admin | Mows ground of grass in range with percent chance | ✓ |
| /time <set/add> [<amount>] | Admin | Sets/adds world time (can use (mid)day or (mid)night) | ✓ |
| /clearall [<global>] | Admin | Clears all entities | ✓ |
| /clearmobs [<global> [<type>]] | Admin | Clears all mobs or a specific type on your level or on all loaded levels | ✓ |
| /clearevents [<global> [<type>]] | Admin | Clears all events on your level or on all loaded levels | ✓ |
| /tp [<player1>] <player2/home/death/spawn> | Admin | Teleports player1 to player2 or other location | ✓ |
| /print <message> | Admin | Prints a message in the chat | |
| /give [<player>] <item> [<amount>] | Admin | Gives item to player | ✓ |
| /buff [<player>] <buff> [<seconds>] | Admin | Gives buff to player | ✓ |
| /clearbuff [<player>] <buff> | Admin | Clears buff from player | ✓ |
| /reveal [<player>] | Admin | Reveals entire clients current level | ✓ |
| /setisland [<player>] <islandX> <islandY> [<dimension>] | Admin | Changes the island of the player | ✓ |
| /setdimension [<player>] <dimension> | Admin | Changes the dimension of player | ✓ |
| /hp [<player>] <health> | Admin | Sets the health of player | ✓ |
| /maxhp [<player>] <health> | Admin | Sets the max health of player | ✓ |
| /mana [<player>] <mana> | Admin | Sets the mana of player | ✓ |
| /maxmana [<player>] <mana> | Admin | Sets the max mana of player | ✓ |
| /hunger [<player>] <hunger> | Admin | Sets the hunger percent of player | ✓ |
| /deleteplayer <authentication/fullname> | Admin | Deletes a players files in the saved players folder | |
| /settings <list/setting> [<arg>] | Admin | Change server world settings | |
| /difficulty <list/difficulty> | Admin | Changes difficulty setting | |
| /deathpenalty <list/penalty> | Admin | Changes death penalty setting | |
| /raids <list/frequency> | Admin | Changes raids frequency setting | |
| /pausewhenempty <0/1> | Admin | Enable/disable pause when empty setting | |
| /maxlatency <seconds> | Admin | Sets the max latency before client timeout | |
| /ban <authentication/name> | Admin | Bans a player | |
| /unban <authentication/name> | Admin | Removes a ban | |
| /bans | Admin | Lists all current bans | |
| /rain [<islandX> <islandY> <dimension>] <start/clear> | Admin | Sets the rain on the level | ✓ |
| /enchant <clear/set/random> [<slot>] [<enchantID>] | Admin | Clears, sets or gives a random enchant (use -1 slot for selected item) | ✓ |
| /copyitem [<slot>] | Admin | Copies an item and all of its data | ✓ |
| /healmobs <health> [<range>] [<filter>] | Admin | Heals mobs around you | ✓ |
| /copyplayer <from> <to> | Admin | Copy a players inventory, position and health over to another | ✓ |
| /demo [<player>] [<setup> [<forceNew>]] [<builds>] | Admin | Setups up a world and/or build for player | ✓ |
| /getteam <player> | Admin | Gets the current team of the player | |
| /clearteam <player> | Admin | Removes the player from his current team | |
| /setteam <player> <team> | Admin | Sets the team of the player. | |
| /setteamowner <team> <player> | Admin | Sets the owner of the team. The new owner must be part of the team already | |
| /motd <clear/get/message> | Admin | Sets or clears the message of the day. Use \n for new line | |
| /changename <player> <name> | Admin | Changes the name of a player | |
| /sharemap [<from>] <to> | Admin | Shares your map discoveries with another player | ✓ |
| /stop, /exit or /quit | Owner | Saves and stops the server | |
| /password [<password>] | Owner | Set a password of the server, blank will be no password | |
| /permissions <list/set/get> [<authentication/name> [<permissions>]] | Owner | Sets a players permissions | |
| /regen [<islandX> <islandY> <dimension>] [<biome>] [<seeded>] | Owner | Regenerates the entire level | ✓ |
| /allowcheats | Owner | Enables/allows cheats on this world (NOT REVERSIBLE) | ✓ |
| /itemgnd [<slot>] <set/get/clear> [<key> [<value>]] | Owner | Gets or sets item GND data | ✓ |
| /jobsearchrange <range> | Owner | Sets the job search tile range of settlers | |
| /language <language> | Server | Sets server language settings |
Server Parameters[edit]
The following parameters can be added to customize server configuration. Found in Necesse.jar under necesse.engine.platforms.desktop.server package, DesktopServerWrapper.class file.
Parameters not given will be loaded from server settings file.
| Parameter | Description |
|---|---|
| -help | Shows this help menu |
| -nogui | Runs the server in terminal instead of opening the GUI |
-settings <file> |
Settings file path to load server settings from |
-world <name> |
World to load instead of being asked which to load |
-port <port> |
Port to host at |
-slots <slots> |
Amount of player slots |
-owner <name> |
Anyone that connects with this name, will get owner permissions |
-motd <message> |
Sets the message of the day. Use \\n for new line |
-password <password> |
The password for the server, blank for no password |
-pausewhenempty <1/0> |
Pauses the world when there are no players in server, defaults 0 |
-giveclientspower <1/0> |
If the server should check client actions, a kind of anti-cheat. When off it will give a much smoother experience for clients. Defaults off. |
-logging <1/0> |
If on the server will generate a log file for each session, defaults 1 |
-logs <folder> |
What folder to place the logs, if logging is enabled |
-zipsaves <1/0> |
If saves should be compressed, defaults to 1 |
-language <language> |
Sets the language of the server, only used for occasional messages in log |
-ip <address> |
Binds the server IP to the address |
-datadir <path> |
Sets the path where cache, latest log, saves etc. are stored. Defaults to Necesse folder in appdata on different platforms |
| -localdir | Same as -datadir, but uses the local directory the server is launched from |
| -ignoreseasons | Disables seasonal content, e.g. Christmas Present, Christmas Hat, etc. |