Modding
Modding is the act of modifying, adding or removing content and features. Mods are created by the community, and shared through the Steam Workshop. They can be anything like adding more items and monsters, adding a new language, changing the textures in the game, adding new features, tweaking balance and much more.
Necesse mods are created using the Java programming language.
Installing and using mods[edit]
Steam Workshop[edit]
Modders usually share their mods on the Steam Workshop. If you subscribe to a mod, the next time you launch the game a mods button will appear in the main menu. In this menu you can see the mods you have installed, change their load order, enable or disable them.
Dedicated servers and local mods[edit]
For dedicated servers to have mods, they must find and download the mod jar file. Many modders give links to where they can be downloaded on the mods Workshop page. Once you have the jar file, you have to put it inside a mods folder, depending on your system.
If the folder does not exist on your system, you can create one yourself.
Note: ONLY the jar file is needed for the mod to be active, the rest of the files within the example mod are for gradle tasks to help make testing easier
- Windows: %APPDATA%/Necesse/mods/
- Linux: ~/.config/Necesse/mods
- Mac: ~/Library/Application Support/Necesse/mods/
- Windows dedicated Server over steamcmd
Install your server as usual with steamcmd with the AppID 1169370.
Create then in your server install directory a new folder mods as example: c:\Servers\Necesse\mods
Then you have to edit the server start parameters (in startserver-nogui.bat)
default: start jre\bin\java.exe -jar Server.jar -nogui %*
edit in: start jre\bin\java.exe -jar Server.jar -nogui -datadir .\data -mod .\mods
Then copy your .jar mod files downloaded over the steam workshop as explained earlier in this thread into the mods folder. The server will recognize on startup the mods in the folder and loads them.
Texture/Resource packs[edit]
Texture packs are not officially supported, except through the modding system. However, it is still possible to overwrite existing textures inside the game. To do so, follow the steps:
- Download the official textures, found on the Official Discord server, in a pinned message inside the wiki channel.
- Browse to the games install directory. You can do so by right-clicking the game in your Steam library -> Manage -> Browse local files.
- Extract the texture files into "<Necesse install directory>/res". If the "res" folder does not exist, you have to create it yourself.
The next time you launch the game, the textures will be loaded from those extracted files. This means you can edit or replace any of the files and that will then be loaded instead.
Creating mods[edit]
Necesse mods are created using the Java programming language. This place is not for you to learn Java, there are plenty of tutorials and resources on that out on the internet already.
Mods are packaged inside a jar file for the game to load during runtime. When modding, it's a good idea to have a decompiler (included in most IDEs). The source code won't be released yet (if ever), and many topics are not explained thoroughly yet. This means you often have to rely on decompiling classes and checking out how they are done in the core game.
The Official Discord Server has a channel dedicated to modding where you can ask questions, get help and request new modding features for the game and all other things Necesse modding.
New in v. 0.21.27[edit]
If you are just starting out modding, you can skip this section.
In version 0.21.27 and forward, the game has changed the Java runtime environment it used. If you try to launch the game with the old runtime environment, you may run into crashes or other problems. You can download the runtime currently being used here. To help with compatibility, the language level is still version 8. In IntelliJ, you can change your JDK and language level by going to File -> Project Structure... -> Project. Make sure that Gradle is also using the correct JDK by going to File -> Settings -> Build, Execution and Deployment -> Build Tools -> Gradle -> Gradle JVM. The example project has been updated to use this new Java and Gradle version.
Getting started and example project[edit]
To get started on modding, there is an official example project you can download, found on Github. It includes basic stuff like adding items, tiles, objects, monsters, recipes and more. It also includes build tools using Gradle to easily compile and structure your mod so that it can be read and loaded by the game, as well as development tools like loading your in-development mod, so that you can upload it to the Steam Workshop when complete.
Modding tools[edit]
- An integrated development environment (IDE). For example Intellij IDEA Community which is free.
- A Java development kit. The game is built using Adoptium Java17, which you can find here but for compatibility reasons is still only using language level 8. If you are using the Intellij IDE, this is not needed as a JDK is already included in it. Make sure you are using language level 8 by going to File -> Project Structure... -> Language Level.
- An image editing tool, like pixel art editors Aseprite or Pyxel Edit.
- An audio editing tool, like Audacity or REAPER.
Setting up[edit]
If you have downloaded the example project, it can be loaded using your IDE and almost everything will already be set up for you. All you have to do is configure your build.gradle file with the correct mod info and the games install directory. Once done, it will prompt you to refresh the project.
Running and testing your mod[edit]

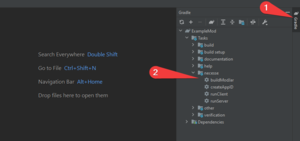
To run your in-development mod, you will need to launch the game with -mod <folder path with your mod jar> option. This is already done for you if you are using the example project and run the runClient Gradle task. It can be found in the far-right toolbar inside Intellij (see image). Using this launch option will also allow you to upload your mod to Workshop once it is complete.
Testing multiplayer[edit]
To test multiplayer, you can run one client with the runClient Gradle task, and another with the runDevClient Gradle task. One client should host the game, while the other should connect through the multiplayer menu. The hosted game should show up as a LAN server, or you can manually connect to it by using "localhost" as IP the address. The dev client will load into the game with a different authentication ID, allowing you to have 2 clients inside the same server.
It's also important to test the dedicated server since it does not have access to the resources the clients load on startup. To do this, run the runServer Gradle task, and run your regular client at the same time. Same as above, you should then be able to see the game inside the multiplayer menu as a LAN server, or you can manually connect to it by using "localhost" as IP the address.
Mod info file[edit]
Note: If you are using the example mod, you can skip this section as it is generated for you using the values you set inside the build.gradle file.
Every mod must have a mod.info file in their jar's top path. The file structure is custom, but very similar to JSON. It's used throughout the game's saved files. The file must have these fields:
- id - The unique ID of your mod. Must be all lowercase and cannot use special characters.
- name - The display name of your mod.
- version - The version of your mod.
- gameVersion - The target game version of your mod.
- description - A short description of your mod.
- author - Your name
- dependencies (optional) - Your mods dependencies are formatted in their IDs and array. Like this: [exammple.mod, other.mod]
- optionalDependecies (optional) - Your mods optional dependencies. They are used together with your dependencies to automatically make a load order for mods.
- clientside (optional) - true/false, if your mod is client/server-side only. This makes it possible for clients to connect to servers without the server needing the mod and vice versa. Defaults to false.
Important notes about your mod.info file:
- Your id should be unique to the mod and never change between versions. A good example for id is "<your name>.<mod name>".
- Avoid special characters that might inflict with the format, like commas, quotes, etc. This will probably be changed later, and you’ll be able to escape characters, just like in Java.
Example of a mod.info file:
{
   id = fair.examplemod,
   name = Example Mod,
   version = 1.0,
   gameVersion = 1.1.1,
   description = Just an example mod,
   author = Fair
}
Mod entry class[edit]
Your mod needs an entry class. This is where the game loads your mod from and calls initialization methods. Create a class with the @ModEntry annotation to tell the game that's where your mod starts.
Important notes about your @ModEntry class:
- Make sure your mod only has one @ModEntry annotation. The game will stop looking for more when found one.
- Make sure the class does NOT have a constructor.
Example for your mod entry class:
import necesse.engine.modLoader.annotations.ModEntry;

@ModEntry
public class ExampleMod {

    public void init() {
        System.out.println("Hello world from my example mod!");
    }

}
The game will look for specific methods within your @ModEntry class. Here's a description of them:
public void preInit()[edit]
This method is called before loading of the core game. It should only be used on rare occasions. If you are not sure about it, don't use it.
public void init()[edit]
This method is called after the core game has been loaded. Here you should register your own tiles, objects, items, mobs and so on.
The general order in which you should register your mod objects to avoid issues are (not forced):
- Tiles
- Objects
- Biomes
- Buffs
- Global ingredients
- Recipe techs
- Items
- Enchantments
- Mobs
- Pickup entities and projectiles
- Level, world events, level data and settlers
- Containers
- World generators
- Packets
- Quests
- Other
public void initResources()[edit]
This method is called only on the client and should load any extra resources your mod uses that the game doesn't automatically load.
The resources will be loaded from a resource folder. You can read more about this in a later section.
Example: Assign a texture:
GameTexture texture = GameTexture.fromFile("path/to/file")
If you have a texture at resources/texture.png you can load it using GameTexture.fromFile("texture")
All sound (.ogg) files need to be placed in resources/sound folder and can be loaded using
GameSound.fromFile("path/to/file")
For example, a song placed in resources/sound/music/MySong.ogg would be loaded as GameSound.fromFile("music/MySong"), ommiting resources/sound
For information on music paths to override music, look at MusicRegistry.registerCore
public void postInit()[edit]
This method is called after the game is done loading all its core, mods and resources.
This is where you should register recipes, create or modify loot tables and spawn tables and register chat commands.
public void dispose()[edit]
This method is called when the game closes. If you have anything that needs to be disposed, that the game doesn't already dispose on it's own, do it here.
Things like textured loaded using GameTexture.fromFile(...) and sounds are automatically disposed.
Building your mod[edit]
If you are using the example project, a lot of this is already done for you. Simply run the buildModJar Gradle task, and it will generate the jar inside the ./build/jar folder.
For the game to recognize your jar, it has to follow a specific structure:
- ExampleMod.jar
- ↳ resources
- ↳ Your resource files
- ↳ Java class files
- ↳ mod.info file
Uploading your mod[edit]

To upload your mod to the Steam workshop, a few conditions have to be met:
- Must be enabled
- Must have a preview.png file in the resources folder
- Must be loaded through the -mod launch option (this is done automatically in the example project when running the runClient Gradle task. You can find more info about this under the beginning of the setting up section).
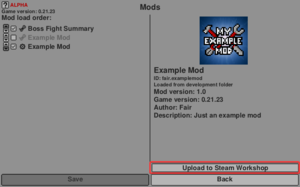
When all of these conditions are met, a button to upload your mod will appear when you select it inside the main menu mods screen. Click this and it will walk you through uploading to workshop. When you first upload, the mod will be hidden and only you will be able to see it. You can change this when you are ready to launch on your mods workshop page.
Localization[edit]
Localization files are needed to give your tiles, objects, items, mobs and other things names. The files should be placed inside the resources/locale folder, and be named the same as the language they are using. Example: en.lang for the english translation.
You can also see how the localization file is structured inside the example mod project.
The file structure[edit]
The file is divided up into categories and keys. If your item has the localization item.exampleitem, it means that it's under the item category and has the key exampleitem.
The language file is read line by line in order. If one line is a category change, all the next keys will be under that category. Here's an example:
[mycategory]
mykey=Text
otherkey=Other text

[newcategory]
differentkey=Different text

[item]
exampleitem=Example item
Translations can have replacements that can be done in runtime. To add a replacement key in your translation, add a <key> somewhere. The key can be anything like <name>, <number> etc. Example: mobhealth=Mob health: <health>
Using a translation inside the game[edit]
Localization.translate(category, key)
Localization.translate(category, key, replaceKey1, replaceString1, replaceKey2, replaceString2, ...)
A lot of places also use the GameMessage class. This is essentially a localizable string, by using LocalMessage which extends GameMessage. Goes the same as above:
new LocalMessage(category, key, replaceKey1, replaceString1, replaceKey2, replaceString2, ...)
If you don't want to use a translation, you can also just give it a static string with new StaticMessage(string...)
Resources[edit]
For the game to load your resources, they have to be placed inside a resources folder in your mod jar.
Using this, it is also possible to overwrite existing ingame textures by placing another texture at the exact same path as the core game ones. In the Discord server, there is a wiki channel with a pinned message where the core textures can be downloaded and used for modding and this wiki.
This also means that your resource files can get overwritten by other mods, so try and keep your file names unique.
Resource loading happens automatically for any files in the resources folder. But some things will look at specific subfolders to load their textures. Examples:
- Items - items/<item stringiD>
- Buffs - buffs/<buff stringiD>
- Biomes - biomes/<biome stringiD>
- Projectiles - projectiles/<projectile stringiD>
More documentation[edit]
Until more documentation gets migrated and added to this wiki, you can use the old documentation here: Published Google docs file Modding Snippets Has examples of other modders coding work that can be used to help you out.
Accessing Necesse Java files[edit]


using the IDE mentioned in Modding Tools, you can decompile java files and take a peek at the core game values.
![]() This article has been marked as a Stub. You can help the Necesse Wiki by expanding it.
This article has been marked as a Stub. You can help the Necesse Wiki by expanding it.
![]() Reason: Need to reformat this section
Reason: Need to reformat this section
Note: Java may need to be installed for this process
You probably need to have Java installed.(external links not allowed)
Download and install the Windows x64 .msi file
Rough Transcript from Discord User Snoobinoob, to be refined:
Open up IntelliJ IDEA and create a new Java project wherever
File > New > Project...
Can leave all settings as is
Once the project is created, open up the project structure
File > Project Structure... (Ctrl+Alt+Shift+S)
select "Modules" from the left navigaiton pane
Click the dependencies tab on the top-right-ish (Decompile1)
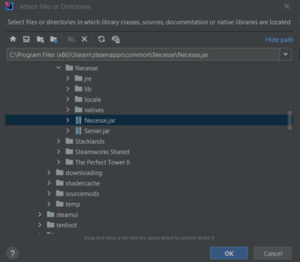
Click the + icon to add a new module and choose "JARs or Directories" (Decompile2)
Browse to the steam files location of Necesse.jar
Should be something like: C:\Program Files (x86)\Steam\steamapps\common\Necesse\Necesse.jar
Should see this (or similar) after clicking the +, choosing JARs or Directories, and browsing to the Necesse.jar location (Decompile3)
Click OK, and you should now see Necesse.jar in the list of dependencies in the previous Modules window
Click OK again to close the project structure window
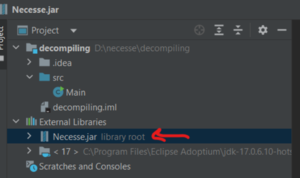
Necesse.jar should now be visible in External Libraries (Decompile4)
Everything should now be set up, so you can search via the Navigate > Search Everywhere menu option
Exactly what to search is up to you, and not always the most obvious